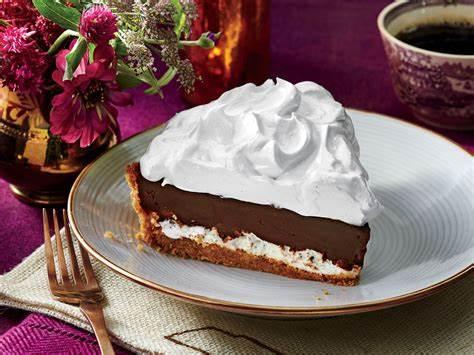
More About Over the Moon Chocolate Pie
Active:
50 mins
Stand:
8 hrs
Total:
8 hrs 50 mins
Yield:
Serves 8
Ingredients
Graham Cracker Crust
1 ½ cups graham cracker crumbs
½ cup unsalted butter, melted
⅓ cup granulated sugar
Marshmallow Layer
1 ½ cups miniature marshmallows
Chocolate Filling
12 ounces semisweet chocolate chips
10 ounces milk chocolate chips
1 cup heavy cream
1 tablespoon unsalted butter
¼ teaspoon kosher salt
1 teaspoon vanilla extract
2 tablespoons (1 oz.) Tennessee whiskey (optional)
Marshmallow Meringue
2 large egg whites
1 cup granulated sugar
¼ cup light corn syrup
¼ teaspoon cream of tartar
¼ teaspoon kosher salt
1 teaspoon vanilla bean paste or vanilla extract
Directions
Step 1
Prepare the Graham Cracker Crust: Preheat oven to 350°F. Place graham cracker crumbs, melted butter, and granulated sugar in a medium bowl. Stir until mixture is well combined and resembles damp sand. Press on bottom and up sides of a 9-inch deep-dish glass pie plate.
Step 2
Bake in preheated oven until crust is firm, dry, and lightly browned, about 10 minutes. Transfer to a wire rack, and cool to room temperature, about 20 minutes.
Step 3
Prepare the Marshmallow Layer: Spread marshmallows in an even layer on bottom of baked Graham Cracker Crust. Return crust to preheated oven, and bake just until marshmallows begin to melt, about 3 minutes. (Do not let marshmallows turn brown or crisp.) Remove from oven and spread melted marshmallows into an even layer using a small offset spatula or the back of a teaspoon. Cool to room temperature, about 20 minutes.
Step 4
Prepare the Chocolate Filling: Combine chocolate chips in a large bowl. Bring cream to a simmer in a medium saucepan over medium-high. Cook until cream is very hot, and bubbles start to form around edges of pan. Remove from heat, and immediately pour over chocolate chips. Let stand 1 minute. Add butter and salt, and whisk until chocolate is completely melted and mixture is smooth. Gently whisk in vanilla, and, if desired, whiskey. Cool to room temperature, 15 to 20 minutes. (Filling should be thickened but still pourable.)
Step 5
Spoon Chocolate Filling over melted marshmallow in piecrust and spread in an even layer. Loosely cover pie with plastic wrap and let stand at room temperature 8 hours or overnight. (No need to refrigerate the pie. It is best left at room temperature.)
Step 6
Prepare the Marshmallow Meringue: Fill a medium saucepan one-third full of water and bring it to a simmer over medium-high. Reduce heat to low, maintaining a simmer.
Step 7
Whisk together egg whites, sugar, light corn syrup, cream of tartar, and salt in a large heatproof bowl. Set bowl over saucepan of simmering water. (Or use a double boiler instead of saucepan and heatproof bowl.) Cook, whisking constantly, until sugar completely dissolves. Remove bowl from heat.
Step 8
Beat mixture with an electric mixer on medium speed until mixture begins to thicken, scraping down sides of bowl often to maintain a smooth texture, 3 to 4 minutes.
Step 9
Increase mixer speed to high and continue beating and scraping down sides as mixture thickens and becomes smooth and shiny. Continue beating until mixture becomes a glossy meringue that holds its shape, clings to a spoon, forms curly peaks, and leaves tracks from beaters in surface, 5 to 10 minutes.
Step 10
Add vanilla bean paste. Beat on high speed, scraping down sides of bowl often, until meringue starts to lose its glossy shine and develops a sheen, 1 to 2 minutes.
Step 11
Spoon Marshmallow Meringue over top of pie. (Use meringue within 2 to 3 hours for fluffiest texture, or cover and refrigerate for up to 3 days. Meringue will lose a little of its puffiness and loft but remain beautiful, usable, and delicious.)
Did you know you can follow any of our 175 Special Interest calendars and stay informed better than ever before? See them here. You can also create your own public or private calendar here. Post events to your calendar and ours at the same time! Terms and conditions may vary based on the policies of your local Town Planner publisher.
To learn more, watch our intro video!